Table of ContentsTools<<Back to OSDM Feature Notes - Direction | Feature Notes Home | Forward to OSDM Section Home >> Utilities
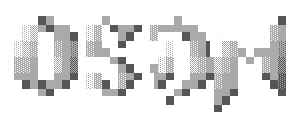
Create Shadow to ImageAdds a 2 pixels wide shadow to an image and copies the result into the clip-board (to be pasted into a new image file via an image editing program such as MS Paint or similar). The shadow is based on a light source which is pointing from a 270 degrees angle at the source image. A shadow is only rendered where the RGB value of the source image is black (0,0,0). The RGB value of the shadow is almost black (1, 1, 1) to prevent that its rendered transparent in OSDM, but still looks black to the human eye.
This is an example of an image and the result after the create shadow tool was used. The original black background of the images were replaced with this bright pink color for contrast. Also some extra pixels were added at the end to illustrate a problem that you need to be aware of. If you want to add a shadow to an image via this tool, make sure that your image has at least 2 pixels at the bottom and at the right as margin in black color (RGB 0,0,0) that the tool will be able to render a correct shadow. In the example below it could not do it, because the main parts of the logo image went right to the borders with no margins to add a shadow below or on the right side. Convert IFF/LBM to BitmapConverts Amiga/PC Deluxe Paint Images (.IFF (Amiga) and .LBM (PC) files) to Windows Bitmap Image format (.BMP) Convert MOD to XMConverts Amiga Pro-Tracker, SoundTracker and compatible .MOD tracker music files to the FastTracker 2 format .XM. Note: OSDM uses the DOS command line tool "Mod and S3M to XM converter Version 1.0" (MOD2XM.EXE) by Arnaud Hasenfratz, which does not work under Win 64bit systems Pack/DepackAllows the compression and decompression of various objects used in OSDM. The packing reduces the size of the used files and thus helps with the extending of some of the limitations imposed by OSDM on the allowed file size. Objects that can be packed and unpacked with this utility options are:
* Note: If you pack a text format vector object file, it will be converted to binary format and is much smaller in size (80% or more smaller). You cannot edit such packed VOBJ/OBJ files with a text editor anymore, but OSDM can load them. You can also DEPACK them (unpack) at any time, if you need to make changes to any of them. Create Multiple 3D BallObject
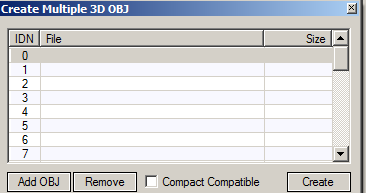
If you select that and then click the little black "play" button to the left a pop-up opens with a grid for IDN, File and Size and the options to Add OBJ, Remove it and a "Create" button. You use the Add and Remove buttons to create a list of 3D Ball objects that you would like to use in your demo. When done, click on "Create" and you will be asked to save the new collection in a new file with the extension ".mOBJ". This mOBJ file can be selected as a 3D Object, just like your regular OBJ files, however, you loose the ability to preview your 3D Ball objects. It also requires the use of the OSDM "Script Feature" (under "Regie\Script") to make use of the multiple 3D Ball objects. The individual 3D Ball objects within the mOBJ collection can be activated via the IDN command in OSDM Script. For example: CAL = 3DBALL ;Start 3DBall Effect* (*must be enabled on MAIN screen) LEA = 3DBALL ;Activate 3DBall Effect for Script Control IDN = 0 ;Activates the first 3DBall Object in your mOBJ file ... Note: "Include Script and sort effects by Storyboard only" Checkbox must be enabled under "Regie\Script" in order to execute it. The format of the .mOBJ file is idential to the .mVOBJ file format. Create Multiple 3D VectorObject
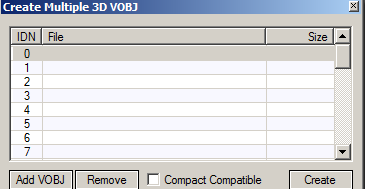
If you select that and then click the little black "play" button to the left a pop-up opens with a grid for IDN, File and Size and the options to Add VOBJ, Remove it and a "Create" button. You use the Add and Remove buttons to create a list of vector objects that you would like to use in your demo. When done, click on "Create" and you will be asked to save the new collection in a new file with the extension ".mVOBJ". This mVOBJ file can be selected as a 3D Object, just like your regular VOBJ files, however, you loose the ability to preview your vectors. It also requires the use of the OSDM "Script Feature" (under "Regie\Script") to make use of the multiple vector objects. The individual vector objects within the mVOBJ collection can be activated via the IDN command in OSDM Script. For example: CAL = 3DVECTOR ;Start 3D Vector Effect* (*must be enabled on MAIN screen) LEA = 3DVECTOR ;Activate 3DVector Effect for Script Control IDN = 0 ;Activates the first Vector Object in your mVOBJ file ... Note: "Include Script and sort effects by Storyboard only" Checkbox must be enabled under "Regie\Script" in order to execute it. A description of the .mVOBJ file format can be found here. Export SettingsCompress Final Executable
For some of those executable Packers additional settings can be specified like "Efficieny" and "Buffer" Size Exit Key - The key a user has to press to exit/quit a running OSDM intro executable
Additional Settings
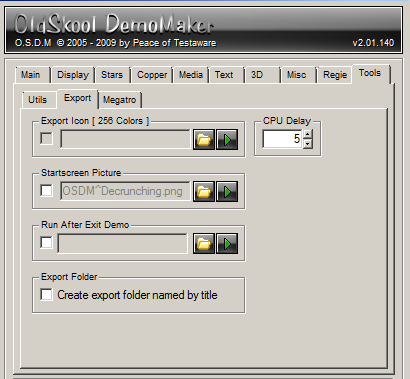
Tools/Export
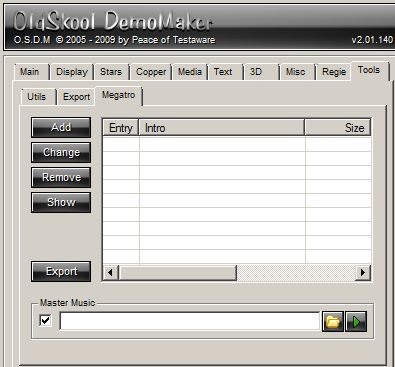
(under construction) Tools/Megatro Builder
(under construction) <<Back to OSDM Feature Notes - Direction | Feature Notes Home | Forward to OSDM Section Home >> |
|

|